
Step-by-Step Ivy Propagation Guide for Green Thumb Success: Embark on a journey of verdant transformation as we unveil the secrets to effortlessly propagating ivy, from selecting the perfect cuttings to nurturing thriving new plants. This comprehensive guide empowers you to unlock the potential of this versatile vine, transforming your home and garden with lush, cascading greenery.
Whether you’re a seasoned gardener or a budding green thumb, this step-by-step guide provides clear instructions and valuable tips for achieving successful ivy propagation. From understanding the ideal time for taking cuttings to mastering the art of rooting in water or soil, we cover every aspect of the process, ensuring your journey is rewarding and enjoyable.
Introduction to Ivy Propagation
Ivy propagation is a rewarding and cost-effective way to expand your collection of these versatile plants. By creating new plants from cuttings or divisions, you can enjoy the beauty of ivy in different areas of your garden or home. Propagating ivy offers several advantages.
Firstly, it allows you to multiply your existing plants, providing you with additional specimens for landscaping, container gardening, or sharing with friends and family. Secondly, it’s a cost-effective method as you can create new plants without spending money on buying them from nurseries.
Thirdly, propagating ivy helps preserve genetic diversity, ensuring the continuation of desirable traits in future generations of your plants.
Step-by-step guides, like this one for ivy propagation, are essential for gardening success. The principles of taking cuttings and encouraging root development are similar across many plants, and you can even apply them to roses, as demonstrated in our guide on How To Propagate Roses From Cuttings: Unveil the Secrets to a Stunning Rose Garden.
With the right technique and a bit of patience, you’ll be well on your way to growing your own lush ivy and fragrant rose gardens.
Methods of Ivy Propagation
Ivy propagation can be achieved through various methods, each with its own advantages and considerations.
- Stem Cuttings:This is the most common and straightforward method. It involves taking cuttings from healthy stems and rooting them in a suitable medium. Stem cuttings are ideal for propagating most ivy varieties.
- Leaf Cuttings:Some ivy varieties can be propagated from leaf cuttings, although this method is less common than stem cuttings. Leaf cuttings involve taking a healthy leaf and rooting it in a suitable medium. This method is particularly effective for ivy varieties with fleshy leaves.
- Layering:Layering is a method that involves encouraging roots to develop on a stem while it’s still attached to the parent plant. This technique is particularly useful for propagating ivy that grows along the ground or on walls.
- Division:Ivy plants can be divided to create new plants from existing ones. This method is suitable for ivy that grows in clumps or mounds. Division involves carefully separating the plant into smaller sections, each with its own roots and shoots.
Tools and Materials
To successfully propagate ivy, you’ll need a few essential tools and materials:
- Sharp knife or scissors:For taking clean cuts from the parent plant.
- Rooting hormone (optional):This can help promote root development in cuttings.
- Potting mix:A well-draining mix suitable for rooting cuttings or starting seeds.
- Containers:Pots or trays to hold the cuttings or divisions.
- Clear plastic wrap or dome:To create a humid environment for cuttings to root.
- Watering can:For keeping the rooting medium moist.
Taking Ivy Cuttings
The success of your ivy propagation hinges on the quality of the cuttings you choose. Selecting the right cuttings at the optimal time is crucial for maximizing your chances of rooting success.
Selecting Healthy Cuttings
The ideal time to take ivy cuttings is during the spring or early summer when the plant is actively growing. This period provides the cuttings with the necessary energy and nutrients for successful root development.
- Choose healthy, vigorous stems:Avoid stems that are diseased, damaged, or have signs of pest infestation. Opt for stems that are green and have a good amount of foliage.
- Look for stems with nodes:Nodes are the points on the stem where leaves grow. They contain dormant buds that will develop into roots. Aim for cuttings that have at least two or three nodes.
- Cuttings should be 4-6 inches long:This length provides enough surface area for root development while also ensuring the presence of multiple nodes.
Preparing Cuttings for Propagation
Once you have selected your cuttings, prepare them for propagation to increase their chances of rooting.
- Make a clean cut:Use a sharp knife or pruning shears to make a clean, angled cut just below a node. This angled cut will help to increase the surface area for root development.
- Remove lower leaves:Remove any leaves that will be submerged in the rooting medium. This prevents the leaves from rotting and potentially infecting the cutting.
- Dip cuttings in rooting hormone (optional):Rooting hormone is a powder or liquid that encourages root growth. It is not essential for ivy propagation, but it can increase the success rate.
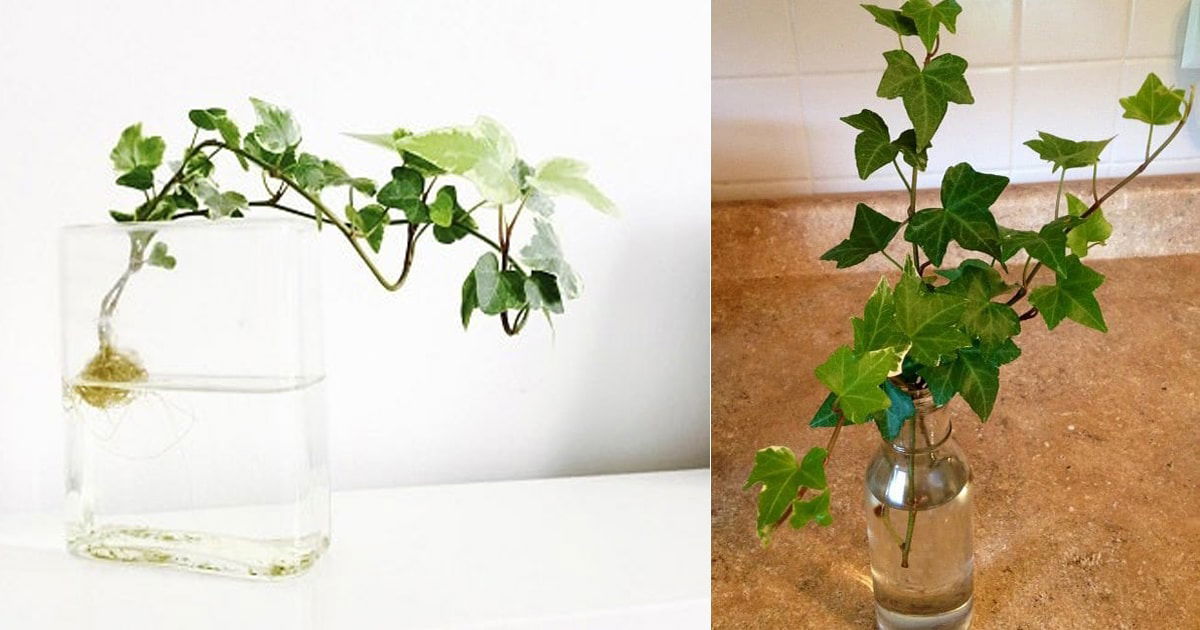
Rooting Ivy Cuttings in Water
Rooting ivy cuttings in water is a simple and effective method that allows you to observe root development firsthand. This method is particularly suitable for beginners as it eliminates the need for specialized rooting mediums and provides a clear visual of the rooting process.
Maintaining Water Quality for Optimal Root Growth
Maintaining the water quality is crucial for successful rooting. Stagnant water can harbor bacteria and fungi that can harm the cuttings.
- Regular Water Changes:Change the water every 2-3 days to prevent stagnation and maintain a clean environment for root development.
- Use Filtered or Bottled Water:Tap water may contain chlorine and other chemicals that can inhibit root growth. Using filtered or bottled water is recommended.
- Avoid Overfilling:Ensure the water level is just below the nodes where roots will emerge. Overfilling can lead to stem rot.
Signs of Successful Rooting
As the cuttings develop roots, you’ll observe several visual cues indicating their readiness for transplanting.
- Root Formation:The most obvious sign is the emergence of roots from the nodes. These roots will typically be white and thread-like, gradually thickening as they grow.
- New Growth:The presence of new leaves or shoots on the cutting is a good indicator of successful rooting and healthy plant development.
- Strong Root System:Once the root system is well-established, it will be visible as a cluster of roots emanating from the cutting. The roots should be firm and healthy, not mushy or discolored.
Rooting Ivy Cuttings in Soil
Rooting ivy cuttings in soil offers a more traditional and often more successful method compared to rooting in water. The soil provides a stable environment that encourages root development and prepares the cutting for eventual transplantation.
Preparing the Soil
Preparing the soil for rooting ivy cuttings is crucial for providing the right conditions for successful root growth. The soil should be well-draining to prevent waterlogging, which can lead to root rot. A mixture of potting soil and perlite or vermiculite is ideal, as it provides the necessary aeration and drainage.
- Use a high-quality potting mix designed for seed starting or general-purpose potting.
- Mix in perlite or vermiculite to improve drainage and aeration.
- Moisten the soil thoroughly before planting the cuttings.
Planting the Cuttings
Planting the cuttings correctly in the prepared soil is essential for promoting root development.
- Make a small hole in the soil using a pencil or your finger.
- Insert the cutting into the hole, ensuring that at least one node (the area where leaves grow) is buried in the soil.
- Gently firm the soil around the base of the cutting.
Providing Adequate Light and Moisture
After planting, it’s important to provide the cuttings with the right conditions to encourage root growth.
- Place the cuttings in a bright location, but avoid direct sunlight, which can scorch the leaves.
- Keep the soil consistently moist but not soggy.
- Water the cuttings regularly, ensuring that the soil is evenly moistened.
- You can use a spray bottle to mist the leaves and maintain humidity.
Caring for Rooted Ivy Cuttings

Once your ivy cuttings have developed roots, you’ll need to provide them with the proper care to ensure they thrive and grow into healthy plants. This involves providing adequate light, water, and nutrients, as well as gradually acclimating them to outdoor conditions before transplanting them.
A step-by-step ivy propagation guide can unlock the secrets to growing your own lush, green paradise. From taking cuttings to providing the right conditions for rooting, every step is crucial. For a deeper dive into the world of ivy propagation, explore Unlock the Magic of Ivy Propagation – Grow a Lush, Green Paradise , where you’ll find valuable insights on maximizing your success.
Once you’ve mastered the art of propagation, you’ll be well on your way to creating a stunning display of ivy that adds vibrancy and beauty to your home or garden.
Light Requirements for Rooted Ivy Cuttings
Rooted ivy cuttings need bright, indirect light to grow well. Avoid placing them in direct sunlight, as this can scorch their leaves. An east-facing window or a location with filtered sunlight is ideal. You can also use grow lights to supplement natural light, especially during the winter months.
Watering Rooted Ivy Cuttings
Keep the soil consistently moist but not soggy. Allow the top inch of soil to dry out between waterings. Overwatering can lead to root rot, while underwatering can cause the cuttings to wilt.
Nutrients for Rooted Ivy Cuttings
After a few weeks, you can start fertilizing your rooted ivy cuttings with a diluted liquid fertilizer formulated for houseplants. Follow the instructions on the fertilizer label for the appropriate dilution and frequency. Avoid overfertilizing, as this can damage the roots.
Hardening Off Rooted Ivy Cuttings, Step-by-Step Ivy Propagation Guide for Green Thumb Success
Before transplanting your rooted ivy cuttings outdoors, it’s crucial to harden them off. This process gradually acclimates them to the harsher outdoor conditions, reducing the risk of shock and ensuring their survival. Start by placing them outdoors for a few hours each day, gradually increasing the exposure time over a week or two.
Choose a location with filtered shade and protect them from strong winds and direct sunlight.
Transplanting Ivy Cuttings
Once your ivy cuttings have developed a healthy root system, it’s time to transplant them into their permanent homes. Transplanting is a crucial step in the propagation process, ensuring your new ivy plants have the space and resources to thrive.
Ideal Time for Transplanting
The best time to transplant ivy cuttings is during the spring or early summer when the weather is warm and the soil is moist. This period allows the cuttings to establish themselves in their new environment before the colder months arrive.
Avoid transplanting during the hottest part of the summer or in the winter when the soil is frozen.
Preparing the Planting Site
- Choose a suitable location:Ivy thrives in partial shade to full shade, so select a spot that receives at least four hours of indirect sunlight daily.
- Prepare the soil:Ivy prefers well-draining soil that is rich in organic matter. Amend the soil with compost or other organic materials to improve its structure and nutrient content.
- Dig a hole:Dig a hole that is slightly larger than the root ball of your ivy cutting. The depth of the hole should be equal to the height of the root ball.
- Water the hole:Before planting, thoroughly water the hole to ensure the soil is moist.
Transplanting the Ivy Cuttings
- Gently remove the cutting:Carefully remove the ivy cutting from its container or water. Be gentle to avoid damaging the roots.
- Place the cutting in the hole:Position the cutting in the hole, ensuring the root ball is level with the surrounding soil.
- Backfill the hole:Fill the hole with the soil you removed, gently pressing it down around the root ball to eliminate air pockets.
- Water thoroughly:After planting, water the ivy cutting thoroughly to settle the soil and ensure the roots are in contact with moisture.
Ensuring Transplant Success
- Keep the soil moist:Newly transplanted ivy cuttings need consistent moisture to establish themselves. Water regularly, especially during the first few weeks after transplanting.
- Provide shade:For the first few weeks, provide some shade to protect the ivy cuttings from the harsh sun. This will help prevent them from drying out.
- Fertilize regularly:After a few weeks, you can start fertilizing your ivy cuttings with a balanced liquid fertilizer to encourage growth.
Troubleshooting Common Ivy Propagation Issues: Step-by-Step Ivy Propagation Guide For Green Thumb Success
Ivy propagation is generally straightforward, but even experienced gardeners can encounter challenges. Observing your cuttings closely for signs of problems can help you identify and address issues promptly, increasing your success rate.
Signs of Problems and Solutions
- Wilting:Wilting leaves are a common sign of dehydration. Ensure the cuttings are kept moist, but not waterlogged. If the soil is dry, water thoroughly until water drains from the drainage holes. If the cuttings are in water, refresh the water every few days and ensure the water level remains above the cut ends.
If wilting persists, consider using a rooting hormone to encourage root growth.
- Yellowing Leaves:Yellowing leaves can indicate overwatering, nutrient deficiency, or a lack of light. If the soil is constantly damp, reduce watering frequency. If the leaves are pale yellow, consider using a diluted fertilizer solution specifically designed for rooting cuttings.
Ensure the cuttings are receiving adequate indirect sunlight.
- Leaf Drop:Leaf drop can be a sign of stress, such as temperature fluctuations, sudden changes in humidity, or overwatering. Maintain a consistent temperature and humidity level for the cuttings. Reduce watering frequency if the soil is consistently wet.
- Mold or Rot:Mold or rot can develop on cuttings if the environment is too humid or if the cuttings are overcrowded. Ensure good air circulation around the cuttings. Remove any moldy or rotten cuttings and sterilize the propagation container before using it again.
- Slow or No Root Growth:If the cuttings are not rooting after several weeks, consider using a rooting hormone to stimulate root development. Ensure the cuttings are receiving adequate indirect sunlight and the temperature is warm enough for root growth.
Conclusion
Congratulations! You’ve now learned the fundamental steps involved in successfully propagating ivy. By understanding the process of taking cuttings, rooting them, and caring for the newly established plants, you can easily create a thriving collection of ivy.
Remember, ivy propagation is a rewarding and enjoyable experience. Experiment with different methods, techniques, and even varieties of ivy to discover what works best for you. You might find that some methods are more successful than others, depending on the type of ivy and your personal preferences.
Additional Resources
To further enhance your knowledge and skills in ivy propagation, consider exploring these valuable resources:
- Local nurseries and garden centers:These establishments often offer workshops and classes on plant propagation, including ivy. They can provide practical advice and guidance tailored to your specific location and climate.
- Online gardening communities and forums:Connect with other plant enthusiasts online to share experiences, ask questions, and learn from their expertise. Many forums and groups are dedicated to propagation, providing a wealth of information and support.
- Books and articles on plant propagation:Numerous publications offer detailed instructions and techniques for propagating various plants, including ivy. Look for books and articles from reputable authors and publishers.
Last Point

With a little patience and care, you can easily propagate ivy and enjoy the beauty of this versatile vine for years to come. From cascading green walls to vibrant hanging baskets, the possibilities are endless. Remember, the key to success lies in understanding the basics, following our detailed instructions, and embracing the joy of nurturing new life.
So, gather your tools, choose your cuttings, and let the adventure of ivy propagation begin!
FAQ Insights
What are the best types of ivy for propagation?
English ivy (Hedera helix) and Boston ivy (Parthenocissus tricuspidata) are popular choices for propagation due to their ease of rooting and adaptability.
Can I propagate ivy from seeds?
While possible, propagating ivy from seeds is a less common method and can take longer to produce mature plants.
How often should I water my ivy cuttings?
Keep the soil or water consistently moist, but avoid overwatering, which can lead to root rot.
When should I fertilize my rooted ivy cuttings?
Start fertilizing with a balanced liquid fertilizer once the cuttings have established themselves and are actively growing.
